If in a previous article we talked about how to remotely electronically sign PDF files with Paperless webSIGN, in this material we propose the approach of electronic signing business documents in flows involving multiple signatories. Because any document is signed by at least two parties, often requiring several signatures from the same company – administrative, legal, etc..
It is true that after the electronic signing of documents in a company (whatever they are – contracts, annexes, additional documents, decisions, reports, etc.), they can be sent by internal e-mail (between departments and people directly involved) or externally (to partners, suppliers, etc.). But isn't there really a simpler and safer solution? Of course there is – Paperless flowSIGN, the web solution developed by certSIGN for creating multiple document signing flows. Let's see how this actually works, in a few simple steps.
IMPORTANT! Paperless flowSIGN includes both the possibility of remote signing and local signing with qualified certificates stored on token cryptographic devices. So it is not mandatory to have a signature in the cloud, the main advantage of the platform being the possibility to create these electronic signature flows and follow them!
Step 0. Registration
The Paperless flowSIGN application can be configured to:
• local token signing;
• remote signing with authorization through a unique OTP (one time password) code sent via SMS or obtained through an Authenticator application.
So, when we talk about electronic signature in the cloud, we are talking about a high degree of security through two-factor authorization – authentication password and unique OTP authorization code required when signing documents. And you can get this OTP via SMS or through a free Authenticator application (Google or Microsoft Authenticator) that generates the OTP code.
Only in the case of the latter it is necessary to download, install and make the connection between the Authenticator application and the Paperless platform (processes performed only once), which we discussed here.
Step 1. Remote video identification
Paperless flowSIGN allows the realization of the remote video identification process through a mechanism certified as equivalent to the physical presence, according to the eIDAS Regulation no. 910/2014. This can be used to issue a qualified remote electronic signature certificate to signatories in a flow initiated by flowSIGN, if they do not already have one.
The identification made online, through an audio / video interview with a certSIGN operator, involves:
• scanning the data on the identity card using OCR technology (optical character recognition);
• facial scanning, to check if the person performing the identification is the same person from the identity card;
• validation of the retrieved data, by the operator and by the beneficiary.
Step 2. Authentication
Username and password – are the classic "keys" that you will use to access the application, after completing the registration procedure. Access flowsign.ro, enter the user (e-mail) and password (configured in the registration stage) and then click on "Log in".
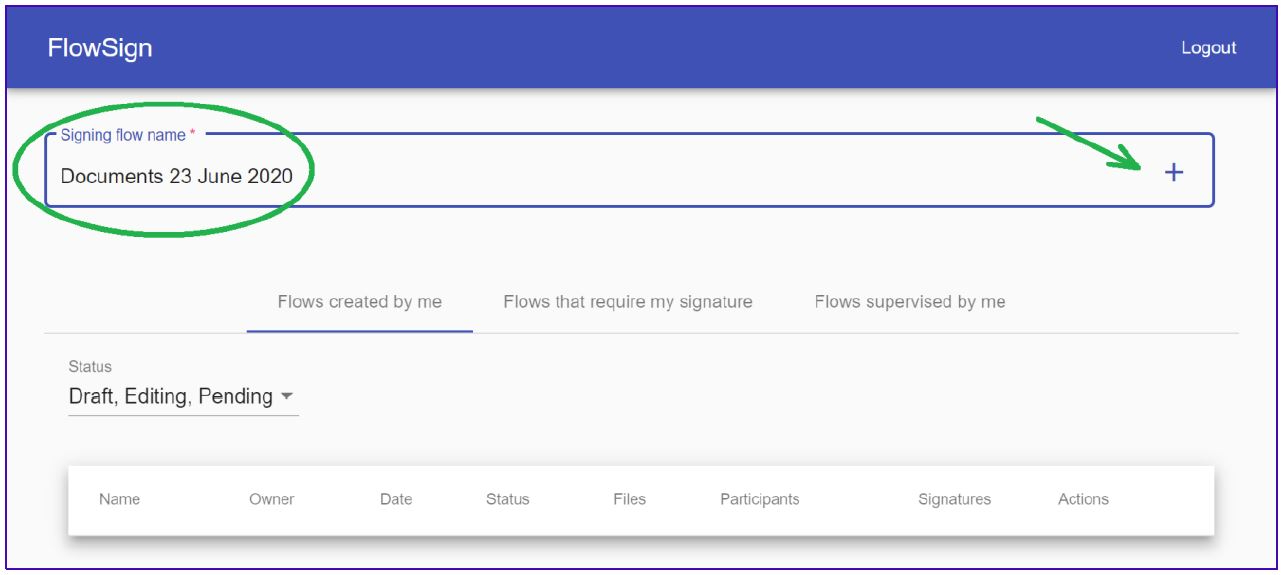
Step 3. Create a signing flow
The flowSIGN dashboard is displayed after successful authentication. In this dashboard you can create, supervise, sign, download signed files, edit or delete streams, depending on your assigned rights.
To create a signature stream, type a name in the Signing Flow name field, then click the [+] button on the right side of the field.
Step 4. Add documents
Follow the Files Manager section where you can add one or more PDF files that require signing, by drag & drop or by clicking "Select files to upload". You can delete a file or rearrange documents by "dragging" them up and down the list. After you have uploaded the files that will be signed, access the "Next" button to proceed to the next step.

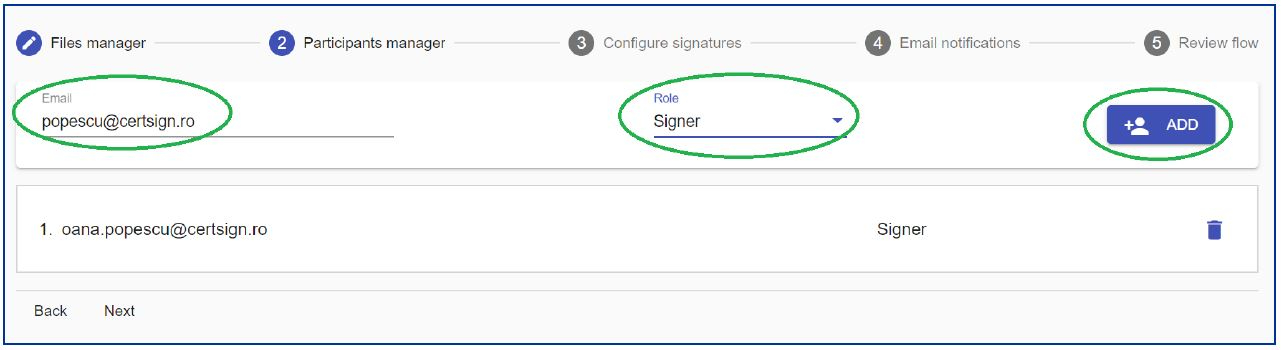
Step 5. Add participants to the signing flow
The next step Participants Manager involves adding participants to the signing flow. Participants are assigned one of the following roles:
• Supervisor – the person who only supervises the flow, receiving a notification each time a participant has signed and when the signing flow is completed;
• Signer – the person involved in the signing process, who must sign the uploaded documents.
IMPORTANT! You can add / register new users through the Paperless flowSIGN web application. Their registration implies the introduction in the platform of a minimal set of data (name, surname, telephone, e-mail), in addition to which other elements such as Identity Card copy, CNP, etc. can be added, in the case of qualified certificates and signature with legal value equivalent to the holographic one.
Step 6. Configure signatures
As the initiator of the signing flow, in the Configure signatures section you must configure the location of the signature, marking on the document to be signed a rectangle, for each signatory. Select the document, then the signer, and in the document preview, select the space where you want the signature to be located. This step must be performed for each signatory and for each flow document.
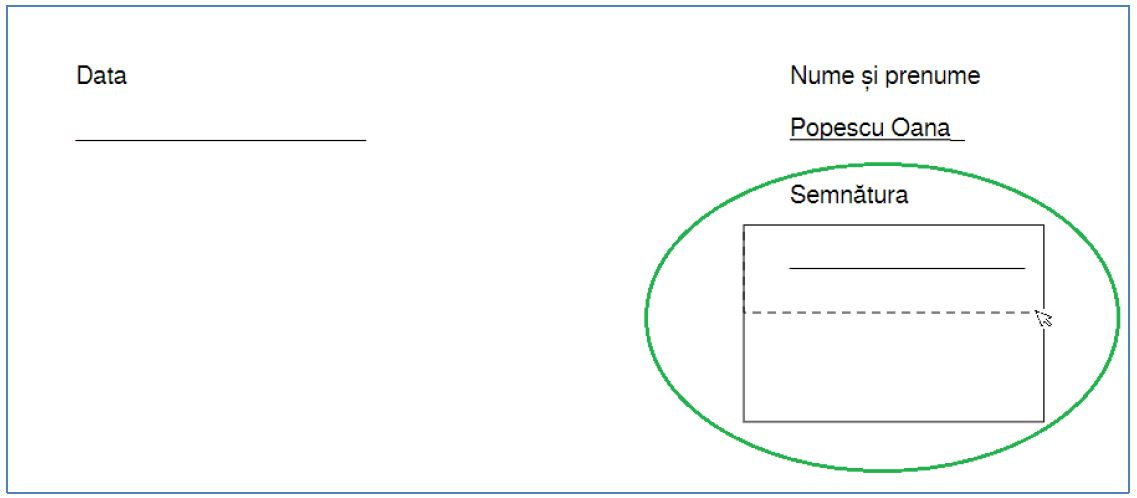
Configuring the signature display position on documents can be done in two ways:
• using the mouse, by clicking in the desired location;
• using the drag & drop mouse to size the area where you want the signature to appear.
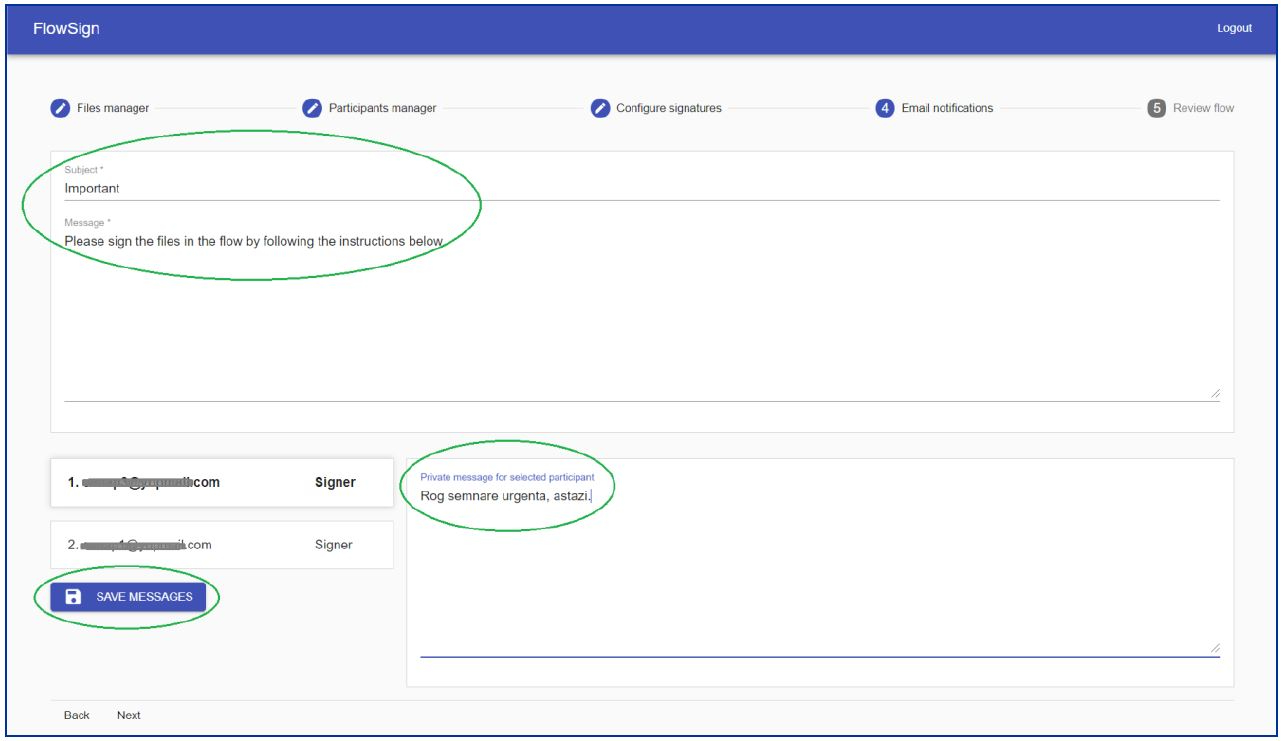
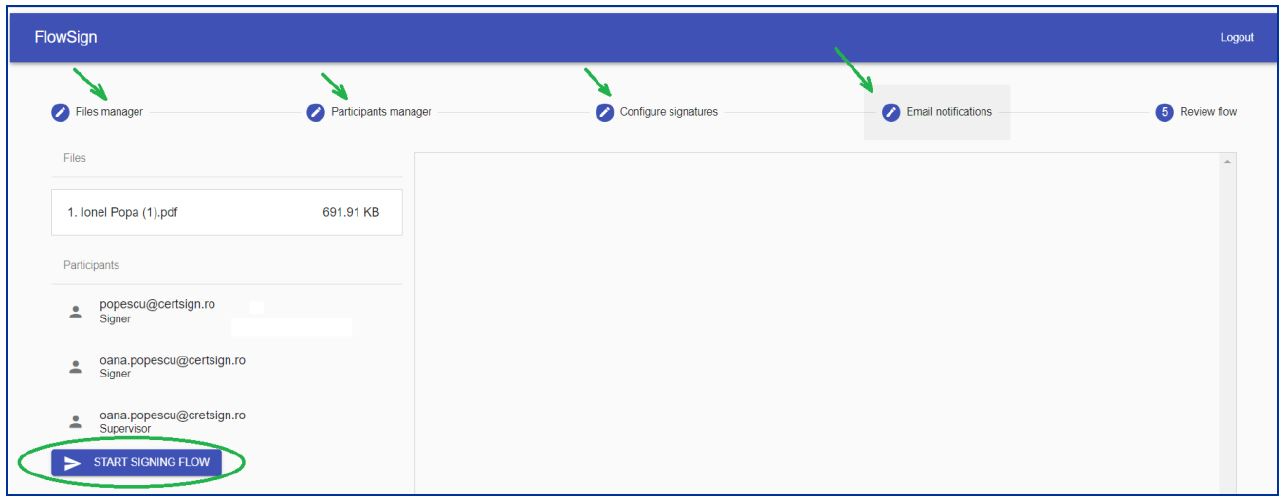
Step 7. Set up email notifications
In Email notifications, as the initiator of the signing flow, you will set the email notifications, which will be sent to each signatory / supervisor. The flow is linear. The e-mail is sent to the first signatory, then to the next one and so on.
You can configure the text of the email notification for all signatories or you can create a private message for the signatory / supervisor.
Step 8. Flow review
In the final Review flow step, before initiating the signing flow, you can examine and review the flow, respectively check the participants and the documents to be signed. After the review, access the "Start signing flow" button.
This is how you can easily address both the internal flows of an organization and the signing flows between organizations or between organizations and individuals! In a future material we will present the steps for the effective signing of PDF documents with Paperless flowSIGN, after creating the flows.
